Thursday 26 January 2012

Series/Parallel Modification

Having a series/parallel switch is a great way to get extra tones from any passive humbucking pickup configuration. Fender American Standard Precision and Jazz basses came with the infamous S1 switch for a time, allowing players to access these tones, and guitar players like Jimmy Page were early adopters of the parallel/series sound, modifying their stock instruments with push/pull pots and mini switches.

Here's the axe getting the mod, a nice Nash jazz-style bass.

Standard volume/volume/tone controls, for now.

Here's the standard layout. Neat!

Out with the old, in with the push/pull switch.

Re-wired and installed.

Done!

This bass can now produce a hotter, deeper tone with a mellow top end, perfect for old school Motown/Stax-style music. When this modification is performed on a precision-style bass, the tone becomes more defined and Stingray-like, with a snappier response.

Tuesday 24 January 2012

Carl Thompson Restoration

Now and then, I get the chance to work on a unique instrument from a well respected luthier. Carl Thompson's bass designs always interested me, and this year I had an opportunity to restore a 4-string made in 2004.

The bass had spent years in humid Queensland, resulting in shrinking and slippage of the glue seams and joints. The customer also suspected truss rod issues, as they were having trouble with relief stability (thankfully, this wasn't the case!).

This bass required a re-fret (as the original frets had been removed and replaced with hardwood veneer), restoration of shifting glue seams and laminates, and a full setup, including nut filing.

First, all hardware was removed and bagged. You can see Carl's signature on the control cavity.

The walnut laminate here was separating from the mahogany centre block.

The tapered headstock laminate glue seam was shifting where it joined the neck, and formed a gap.

It's tricky to see, but the walnut laminate stripe also shifted due to glue slippage.

The accent timber (cat's eyes) on the wings had suffered the worst from the climate.

Some copper shielding had to be replaced due to deterioration.

The original oil finish definitely needed restoration to get back to a low-gloss "glow"

Before beginning the re-fretting, several layers of strong tape were used to protect the top and horns.

A fret-slot depth gauge is critical for making sure the new frets have enough depth for the tang. Also, re-sawing these slots was one of the toughest jobs my fret saws ever tackled. It was blister city!

Once the board was re-slotted, fretting began.

All frets installed.

Bevelling the fret ends, and cleaning up the tangs.

Taped off and ready for levelling.

Rough crowning.

Fretwork is complete. Now on to repairing the finish.

Here's the result of a lot of sanding, hand rubbed oil and wax.

Here's the repaired and re-finished cat's eye.

The top finished beautifully, bringing out the detail in the grain.

Shiny new frets, shiny new finish.

The headstock, restored and re-badged.

Re-strung, set-up and good to go.

Finished!

This was a very satisfying repair, and it was a privilege to restore. This bass is light, fast and very responsive to attack. The truss rod behaved perfectly, and the relief was very controllable (even with the extra long 36" scale).

Saturday 14 January 2012

Custom Pickguard

From time to time I get a request to make a custom pickguard. Sometimes these are a different shape from the original, but usually the customer wants a different look or pickup layout.

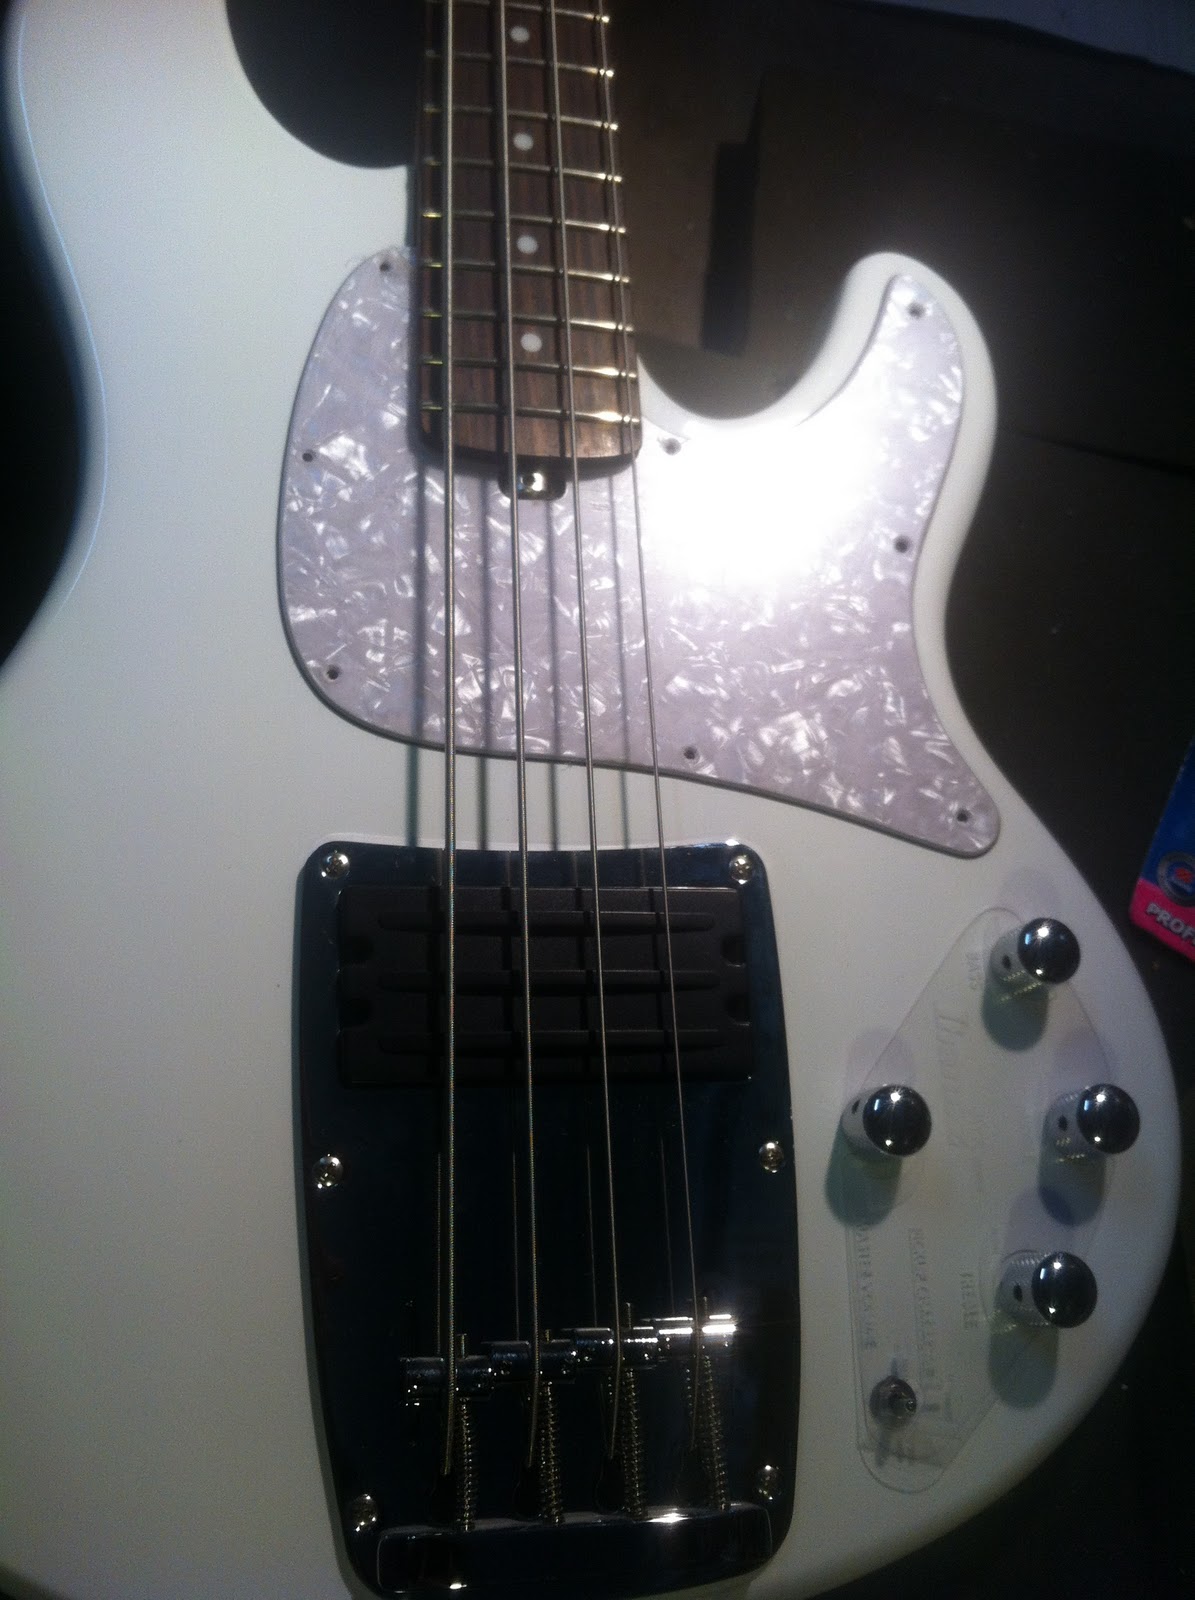
This pickguard was made for a customer with an Ibanez ATK. The original pickguard was 3-ply black, and the custom pickguard would be white pearloid.

The first step is to trace the original pickguard on thin MDF and cut it out on the scroll saw.

More cutting, almost there.

Done!

The next step is hand shaping. You can test-fit the template to the bass this way.

Done. The edge is soaked in superglue to allow a defined surface for the router.

Next, I trace and cut the pickguard again, but on thick MDF.

Main template, rough cut. I'll use the thin template to rout the thick template to size.

The first template is attached to the main template with strong double-sided tape and routed.

Finally, the pickguard blank is attached to the main template and rough-cut to shape.

It's then trimmed flush and bevelled with a 45-degree bit.

Countersinking the screw holes.

Test-fitting the screws.

Done! The pickguard fits perfectly.

Making a pickguard without large guitar production equipment is a slow process, but can yield professional results. It's dusty work, and one screw-up means you have to start all over again, but once you have that template made it's useable for half a dozen or so more pickguards. For the more common pickguard shapes I make the template in perspex for long-term use.

Tuesday 10 January 2012

String Bass...Literally

When I was in Vanuatu a couple of years ago, the bands there were playing what they called "string bass". This was essentially a wooden crate with a stick jammed into the top at one corner with a thin nylon rope running from the top of the stick to the box.

Having a go. It's harder than it looks.

This kid was playing it, with one knee up on the box and the other barely touching the floor. He would sort of punch his right hand past the rope and "pluck" it with his thumb, while his left hand moved the stick back and forth to change the pitch of the note.

He was brilliant, and it sounded great. I couldn't get the thing to go "boom", not even once. I hope I never have to repair one.

Shielding Madness

I've been shielding a lot of guitars lately. Maybe there's more noisy mojo in the air in 2012? Whatever the reason, here's some photos of a BC Rich Bass and Tokai Strat copy getting the silent treatment.

The pickup cavities are lined, and wired to the main ground point.

The control cavity is also lined, with copper tabs over the cover plate screw points.

Same, but different; I've added solder connections to link each piece of copper.

I also like to solder the bridge ground wire to a strip of copper for a guaranteed connection.

Each ground wire goes to a central solder lug screwed into the cavity wall, and then to output ground.

Tokai Strat before...

...and after.

I also shielded the control cavity section of the scratchplate. I could have covered the whole thing, but the Bartolini pickups this guitar was getting are internally shielded and very quiet. The control cavity was the main culprit for noise.

Shielding is often a very effective means of reducing RFI and EMI noise being picked up by a guitar or bass. Single coil hum is a separate issue, although there are ways of reducing and eliminating this as well.